


One of the joys of any garden center is the debut of new plants. This year’s
Serenity Magic Osteospermum is one of those exciting introductions. The plant is over a foot tall and covered in cyber-bronze flowers with a vanishing purple center. That change in itself is quite a colorful contrast, but it gets even better: As the flower matures it fades to a salmon color, a steep contrast to the dark green foliage. No other flower is as expressive in the garden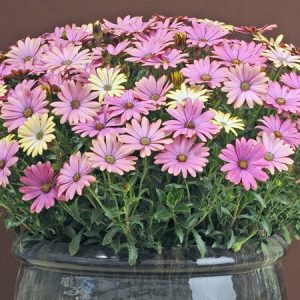 , and as a heat-lover that never stops blooming, it makes an even better container plant! Which leads us right into this week’s topic: container gardens.
The soil is the most important consideration of container gardening. The right potting soil is so important I can become obsessed about the subject. I’ve created several soils over the decades, ever tweaking the formula for better performance. When all the ingredients are just right, the effect on a container garden is almost magical.
Fresh potting soil should be used each spring. For small containers under 14 inches in diameter, all soil should be replaced every spring. Larger pots need the soil replaced that has last year’s roots matted down into it or only the top12 inches of old soil. Stay away from garden soil for your containers; it compacts down too hard and does not drain properly. Use a grower’s grade potting soil only.
Ideally, your new plant should never realize it has been transplanted into different soil. A good potting soil will look exactly like the soil the plant was grown in at the nursery. This is why a ‘Growers Mix’ is best suited for container gardens.
Use soil right down to the bottom of the container. Do not fill the bottom with rocks, pottery shards, or styrofoam peanuts. In an arid climate, you want as much soil in your container as possible, no matter the size of the container
I like a one-inch deep saucer under every pot. Just watered plants should have water run out the bottom of the container until the saucer fills with the excess. Container gardens should be watered early in the morning before the heat of the day. As the soil dries during the day and your plants need more water, the saucer water will wick back up into the container, essentially creating a self-watering pot. But this will happen only if fresh potting soil is used right to the bottom of the container. This is advice best used only in arid climates.
Once you’ve prepared the soil you get to the really fun part of creating a container garden!
Thrill – All design rules are off when making a container garden; go with whatever strikes your fancy. At least one plant should be over-the-top when planting a new container. You’ll know the plant because when you see it you won’t be able to take your eyes off it.
It could be anything, a pepper plant, a showy new annual, or an unusually fancy shrub. It might be a new color, texture, or foliage, but something that makes a bold statement. I’ve even used tropicals, such as a banana, for this show-boater of a plant. The proper design will have at least one of these “centerpieces”, even if it’s planted at the back of the pot.
Spill it – The leading edge should have something flowing over the pot. It should appear as though your plants are so happy they are literally spilling over their containers with joy. To name a few, the short list of these plants includes cascade petunia, calibrachoa, ivy, vinca, bacopa, and ivy geranium. Feel free to mix and match colors for designer fun; you might even have the flowers and foliage match your container.
Fill the rest –Thrillers at the back, spillers to the front, and big, full flowers to fill in the rest of the pot. Choices are not limited to marigold, pansy, coleus, impatience, stock, geranium or that fancy new Serenity Magic osteospermum. Again, have fun mixing colors until that artist inside you is satisfied.
No soil should be showing when the project is complete. A newly planted container garden should look as though it has been growing together for years. Plants should touch foliage-to-foliage, if not root-to-root. A good quality potting soil ensures that the plants will take off with new growth.
Don’t wait for a new container garden to grow: start with large plants. Planted container success skyrockets with this bit of advice alone. Because containers can be difficult to keep hydrated, don’t plant 6-pack sized plants! These tiny plants are nearly impossible to keep alive as outdoor temperatures climb. The roots of larger plants reach 6-8 inches into the soil where the sun cannot dry and bake the roots. Plant a gallon size plant instead and your new garden not only looks mature, but it makes fewer demands for care and water. Watch your garden thumbs “scream with green” after you try this bit of advice. Bigger really is better when gardening in the Southwest.
This weekend is very significant for our family. It was April of 1962 that Watters Garden Center experienced its first spring season in business. That adds up to its 50th year as a physical garden center in Prescott and we have planned a weekend of celebrating at the center! Harold Watters the founder, and my father-in-law has agreed to share a few of the original garden stories from the 1960s. Some of our vendors will be giving away flower, shrub, and tree packages, and there will be radio personalities contributing to the festivities. I’ll be out all weekend answering garden questions and telling some of my garden center stories. To my readers: consider this a personal invitation to the celebration. The weather forecast couldn’t be better for a Happy Golden Anniversary!!
~~ ~~ ~~ ~~ ~~
This morning’s 9:30 gardening class is the last of the spring series. “Professor” Lain will be your teacher talking about “The Newcomers Guide to Spring”. It will be standing room only, so plan on arriving early.
Until next week, I’ll see you at Watters Garden Center.